
I promised it was coming and here is my delivery on that promise.
Say you’ve been working hard to get a great look and setup for your live stream, but in the end it just sounds like an overcompressed acoustic performance through a mundane smartphone microphone. You want to get a great sound so that people can the entire stream, maybe even put your music on their home stereo system to enjoy. Now, I will say that due to the way streaming files are compressed, it will never be perfect. But their are steps to improve the audio of your live stream performance. First, let’s take a look at the bare bones equipment you will need to get the audio sounding great.
The Gear
#1 The Microphone
I’m not going to dwell on this too much but you will need a good solid mic to work with. If you are going to pick up your voice and instrument at the same time I recommend a cardioid condenser microphone. The brand isn’t super important, but spending $100-200 is certainly enough to get a solid recording. Yes, the high dollar mics will sound better (especially if you record the raw audio for later mixing), but the results will not be that dramatic because of the live streaming medium. For using a single microphone to record yourself on the acoustic guitar, place the microphone 1-2 feet away in front of you on the left side (assuming right handed guitar), about level with your collar bone and point it towards your neck. When listening back either tip the microphone more towards your mouth or the guitar to get the right balance between the guitar and vocal sound.
If you are going to take a direct signal from you instrument then a dynamic mic would work well. You can go with a simple Shure SM58 or similar mic that is used regularly in live venues. Or you could invest a little more and go with a Shure SM7B, which could double for more intentional studio recordings in the future. The main point, however, is that a dynamic mic really only works in the event you are able to send your instrument signal through another mic or plugged in directly to our next piece of equipment, the interface.
#2 Recording Interface
This is most important bit for getting your live stream up and going. This serves as the go-between for your microphone and the computer which will be providing the live streaming. The ways of connecting are numerous, such as USB, Firewire and Thunderbolt. Make sure you get one that has the appropriate connection for your computer. The interfaces themselves can come in different packages. Some are mixers with the connection as an output. This can be useful if you want to mix multiple instruments but don’t want to use any recording software in your computer. You can also get a simple interface that just has a couple of mic inputs on the front. The stuff made by Presonus and Focusrite is very good for starting out and is pretty affordable. Also look for the interfaces that have combo jacks for directly plugging in your acoustic guitar or keyboard.
#3 The Camera
The method I’m describing for a live stream involves using your computer (whether laptop or desktop) to live stream your concert. There are some ways to trick a phone to taking audio in from an outside source, but it can be tricky. With that being said, you probably don’t want to use the laptop built-in webcam. However, Logitech makes a number of solid webcams that are very affordable and can provide 1080p HD signals. Anything more than that is excessive as it will have to get downscaled to 720p for streaming. Get one with the appropriate USB connection for your computer and with a USB extension cable you can place it anywhere that gives a good view of the performance. You can get fancier with GoPro cameras and capture cards, but that’s hardly necessary. Although if you want to investigate that, I recommend checking out what cameras people like to use for their Twitch gaming streams.
This is the bare essentials to be able to get some quality audio ready for your live stream. Now, you can go a little more extreme if you’ve got a larger band and add more inputs. If that’s the case, you know how many inputs you will need and what kind of mics will be suitable.
The Stream Setup
Once you are familiar with the hook-ups on your equipment you are ready to get things setup for the live stream concert. For our purposes we are going to be discussing live streaming on Facebook. There are two ways to do this. The first involves directly sending the feeds to the Facebook live streaming interface and the second uses a (free!) third party platform with your digital audio workstation (DAW).
Direct to Facebook
When you go onto your computer at the top just underneath the blue bar there is the “What’s on your mind?” box. At the bottom of that is a button with three dots. Click that to expand the options and select “Live.” This will put you in the Live Producer window (and all it’s glorious setup options).

Here is where the magic happens. First select your camera that you will be using instead of the default one, then for the mic drop down select your mixer or interface. One thing you will need to be careful of is if you are using two or more inputs they will need to be mixed to a stereo image or summed to mono before getting to Facebook (or you could end up with the odd situation of your voice in the left ear and your guitar in the right).
And that’s it, you should be able to preview what your stream will look like before going live just to make sure you are ready. I recommend you do a test live stream on a personal page with a friend or two just to make sure that it looks and sounds good before you commit to going live. Your streaming options are on the left side of the producer page.

This is where you can select where your live stream should appear. You can put it on your personal page, a band page, etc. You can also crosspost to multiple pages, just note that when you do that you will have separate feeds of comments for each page. When everything has been set up as you want, hit that “Go Live” button at the bottom and entertain you whole audience!
Using a Third Party Broadcast Software (OBS)
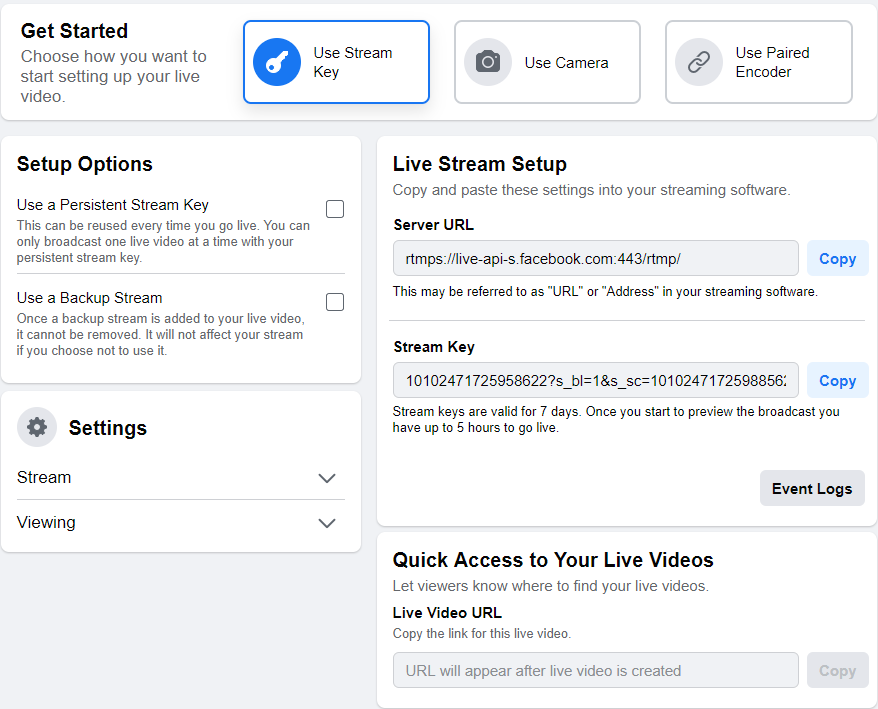
For doing a little fancier streaming with custom overlays and video settings I recommend using OBS. OBS (or Open Broadcast Software) is a free program that can provide live streams to Facebook and YouTube. There is a bit of a learning curve, but it has some great features and is certainly worth learning. Before diving into OBS we will start with changing the stream settings for Facebook, instead of having the Live Producer screen using your camera and microphone you will click the “Stream Key” option. You will need the listed “Stream Key” to plug into OBS.
Now we will turn to the options in OBS. First we need to set up the video / audio feeds. The main screen in OBS is shown below. There are two primary setup methods, scenes and sources. Each scene is comprised of a number of sources. By setting up multiple scenes you can create intro and outro screens that you can prepare in advance and just progress through by using the “Transition” button. Currently I’m showing OBS in the studio mode, which on the right shows what is being recorded or streamed and on the left what scene is going to be coming next.

First you will need to create a scene by hitting the “+” on the left side under you scenes. You can remove unwanted scenes with the “-” button and can rearrange multiple scenes with the arrow buttons. Now with that scene created you will need to add your audio and video sources (surprise!). Each one is independent. As you add the new sources you will give them a name (so they could be reused) and then you will select the camera and audio input. If you want to level up and use your DAW (ProTools, Logic, Cubase, Studio One, etc.) to feed the live stream then instead of selecting an audio input source you will select an audio output source and use whatever is going over your speakers or an independent unused output. You need to be careful when choosing this option so that you ensure other sounds (mouse clicks, pop up notifications, etc.) do not also come through the live stream and are properly disabled.
Now that you have your sources selected and ready to go it’s time to get the settings ready. Hit the “Settings” button on the right hand of the page and we will start with the Stream page. This is where you will copy what was shown in the Facebook Live Producer. Make sure you have also selected the correct service.

Next we turn our attention to the output settings. Here the main thing to focus on is the Video bit rate, 2500 kbps should be sufficient. I have my audio bit rate set to 256, but this gets down-sampled to 128 for Facebook, I just leave it at 256 in the event I record the video at the same time as going live.

Make sure the “Enable Advanced Encoder Settings” and “Enforce streaming service bitrate limits” are checked, and then select “ultrafast” for the encoder preset. The rest of the settings on this page are up to you as far as how large any files are and where they get stored. Keep in mind a live stream does not automatically get recorded.

Finally we move to the video settings. This is where the scaling comes into play. If you have enough CPU horsepower you may not need to do this, but if you see the yellow and red square at the bottom when live streaming your musical performance, this is probably one of the culprits. I use a simple 30 frames per second and scale down to 720p. Overall it looks pretty reasonable when all is said and done. Nothing spectacular, but the audio is where this setup really shines.


We’re not going to win any videography or live musical performance awards for these live streaming concerts, but it does get a much better quality audio out to your fans when performing you next live stream. Check out my previous post if you want some tips on getting your room to look good for your next live musical performance.
Happy streaming!